The MVVM pattern
The Model-View-ViewModel (MVVM) pattern separates an application's user interface from its logic. Instead of mixing display code and behavior in the same file, MVVM splits them into three distinct parts that communicate through data binding.

- View: The structure, layout, and appearance of what the user sees. In Avalonia, views are defined in AXAML files with minimal code-behind. The view gets its data from the view model through bindings.
- View model: The intermediary between the view and the model. It exposes data and commands that the view binds to, handles user interaction logic, and raises
PropertyChangedevents to notify the view when data changes. - Model: The application's domain layer, including data access, business logic, and validation. Examples include repositories, data transfer objects, and service clients.
The view knows about the view model, and the view model knows about the model, but not the other way around. The model has no knowledge of the view model, and the view model has no knowledge of the view. This one-way dependency chain is what makes each layer independently testable and replaceable.
Why use MVVM?
As applications grow, keeping UI definitions and application logic in the same code-behind files leads to problems. Interactions between controls become tangled, and unit testing becomes difficult because your logic is coupled to the UI platform.
MVVM addresses this by moving application logic into POCOs (Plain Old CLR Objects) with no dependency on Avalonia or any UI framework. The benefits are:
- Testability: View models can be unit tested like any other class, without launching a UI.
- Separation of concerns: UI layout and application logic evolve independently. You can redesign the view without touching the view model.
- Natural fit for XAML: Avalonia's data binding system provides the connection between views and view models, making MVVM a natural fit.
When to use MVVM
MVVM adds complexity compared to the code-behind pattern. For a small, simple application, code-behind may be easier to understand and maintain.
You have two strategies to consider:
- Start with code-behind and convert to MVVM if the application becomes difficult to maintain.
- Use MVVM from the start if you expect the application to grow in scope.
MVVM in Avalonia
Views and view models
You implement a view with an AXAML file and its code-behind, and a view model as a plain C# (or F#) class. Each view has a corresponding view model that contains all the logic for that view.
Views are compositions of Avalonia built-in controls, user controls, and optionally custom controls of your own design.
Data binding
Data binding is the key technology connecting views to view models. You can think of the relationship as two layers joined by bindings:
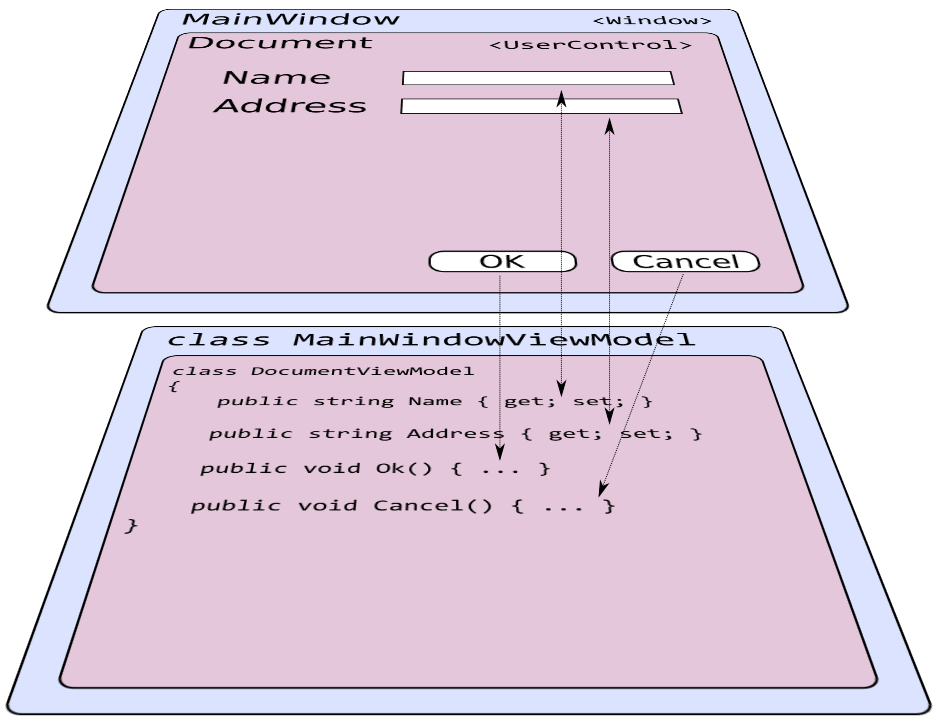
Some bindings are two-way. For example, a text input binds in both directions so that changes in the view model update the control, and user input flows back to the view model. Other bindings are one-way. A button's command binding only flows from the view to the view model.
Because the view model has no reference to the view or to Avalonia types, it can be unit tested like any other code.
The model layer
The model represents everything outside the UI: data storage, network services, business rules. MVVM does not prescribe how you structure your model layer, but the important principle is separation. Use dependency injection to provide model services to your view models rather than creating tight couplings.