Programming with Avalonia
Avalonia lets you develop an application using the XAML markup language and C# (or another .NET language) for code. You generally use XAML markup to implement the appearance of an application while using code to implement its behavior.
Markup
XAML is an XML-based markup language that implements an application's appearance declaratively. You typically use it to create windows and user controls, and to fill them with controls, shapes, and graphics.
The following example uses XAML to implement the appearance of a window that contains a single button:
<Window xmlns="https://github.com/avaloniaui"
        xmlns:x="http://schemas.microsoft.com/winfx/2006/xaml"
        x:Class="AvaloniaApplication1.MainWindow"
        Title="Window with Button"
        Width="250" Height="100">

  <!-- Add button to window -->
  <Button Name="button">Click Me!</Button>
</Window>
Specifically, this XAML defines a window and a button by using the Window and Button elements, respectively. Each element is configured with attributes, such as the Window element's Title attribute to specify the window's title-bar text. At run time, Avalonia converts the elements and attributes that are defined in markup to instances of Avalonia classes. For example, the Window element is converted to an instance of the Window class whose Title property is the value of the Title attribute.
Since XAML is XML-based, the UI that you compose with it is assembled in a hierarchy of nested elements known as an element tree. The element tree provides a logical and intuitive way to create and manage UIs.
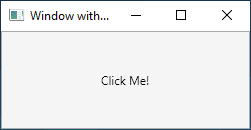
The following images show the user interface that is defined by the XAML in the previous example running on Windows:
Code-behind
The main behavior of an application is to implement the functionality that responds to user interactions, including handling events (for example, clicking a menu, tool bar, or button) and calling business logic and data access logic in response.
In Avalonia, this behavior can be implemented in code that is associated with markup. This type of code is known as code-behind.
The following example shows the updated markup from the previous example and the code-behind (note that there are 2 tabs):
- XAML
- C#
<Window xmlns="https://github.com/avaloniaui"
        xmlns:x="http://schemas.microsoft.com/winfx/2006/xaml"
        x:Class="AvaloniaApplication1.MainWindow"
        Title="Window with Button"
        Width="250" Height="100">

  <!-- Add button to window -->
  <Button Name="button" Click="button_Click">Click Me!</Button>
</Window>
using Avalonia;
using Avalonia.Controls;
using Avalonia.Interactivity;
using Avalonia.Markup.Xaml;

namespace AvaloniaApplication1
{
    public partial class MainWindow : Window
    {
        public MainWindow()
        {
            // Generated with Avalonia.NameGenerator
            InitializeComponent();
        }

        public void button_Click(object sender, RoutedEventArgs e)
        {
            // Change button text when button is clicked.
            var button = (Button)sender;
            button.Content = "Hello, Avalonia!";
        }
    }
}
In this example, the code-behind implements a class that derives from the Window class. The x:Class attribute is used to associate the markup with the code-behind class. InitializeComponent is called from the code-behind class's constructor to merge the UI that is defined in markup with the code-behind class.
You could notice MainWindow class is declared as partial and there is no InitializeComponent implementation visible. That's because InitializeComponent body was auto-generated at the partial class counterpart by the Avalonia.NameGenerator package which is included with Avalonia templates by default.
The combination of x:Class and InitializeComponent ensure that your implementation is correctly initialized whenever it is created. The code-behind class also implements an event handler for the button's Click event. When the button is clicked, the event handler changes the text of the button by setting a property on the Button control.