Panels Overview
Panel 元素是控制元素的呈现方式的组件,包括元素的大小和尺寸、位置以及子内容的排列。Avalonia UI 提供了许多预定义的 Panel 元素,同时也支持构建自定义的 Panel 元素。
Panel 类
Panel 是所有在 Avalonia 中提供布局支持的元素的基类。派生的 Panel 元素用于在 XAML 和代码中定位和排列元素。
Avalonia 包含一套全面的派生面板实现,支持许多复杂的布局。这些派生类公开了属性和方法,以支持大多数标准的 UI 场景。无法找到满足需求的子元素排列行为的开发人员可以通过重写 ArrangeOverride 和 MeasureOverride 方法来创建新的布局。有关自定义布局行为的更多信息,请参阅 Create a Custom Panel。
Panel 公共成员
所有 Panel 元素支持 Control 定义的基本大小和定位属性,包括 Height、Width、HorizontalAlignment、VerticalAlignment 和 Margin。有关由 Control 定义的定位属性的更多信息,请参阅 Alignment、Margin 和 Padding。
Panel 还公开了其他一些属性,在理解和使用布局方面非常重要。Background 属性用于使用 Brush 填充派生面板元素边界之间的区域。Children 表示 Panel 所包含的子元素集合。
附加属性
派生的面板元素广泛使用附加属性。附加属性是一种特殊形式的依赖属性,它没有常规的公共语言运行时 (CLR) 属性 "包装器"。附加属性在 XAML 中有一种特殊的语法,后面的示例中会看到。
附加属性的一个用途是允许子元素存储父元素实际定义的属性的唯一值。这个功能的一个应用是让子元素告诉父元素它们希望在 UI 中如何呈现,这对应用程序布局非常有用。
用户界面面板
Avalonia 中有几个优化支持 UI 场景的面板类:Panel、Canvas、DockPanel、Grid、StackPanel、WrapPanel 和 RelativePanel。这些面板元素易于使用,足够灵活且可扩展,适用于大多数应用程序。
Canvas
Canvas 元素允许按绝对 x- 和 y- 坐标定位内容。元素可以绘制在唯一位置;或者,如果元素占据相同的坐标,则在标记中出现的顺序决定元素的绘制顺序。
Canvas 提供了最灵活的布局支持。Height 和 Width 属性用于定义画布的区域,其中�的元素被赋予相对于父 Canvas 区域的绝对坐标。四个附加属性 Canvas.Left、Canvas.Top、Canvas.Right 和 Canvas.Bottom 允许精确地控制对象在 Canvas 内的位置,从而使开发人员可以精确定位和排列元素在屏幕上的位置。
ClipToBounds 在 Canvas 中
Canvas 可以将子元素定位在屏幕上的任何位置,甚至在超出其自定义的 Height 和 Width 的坐标。此外,Canvas 不受其子元素大小的影响。因此,子元素有可能覆盖位于父 Canvas 限界矩形之外的其他元素。Canvas 的默认行为是允许子元素绘制在父 Canvas 限界之外。如果不希望出现这种情况,可以将 ClipToBounds 属性设置为 true## RelativePanel
定义和使用 Canvas
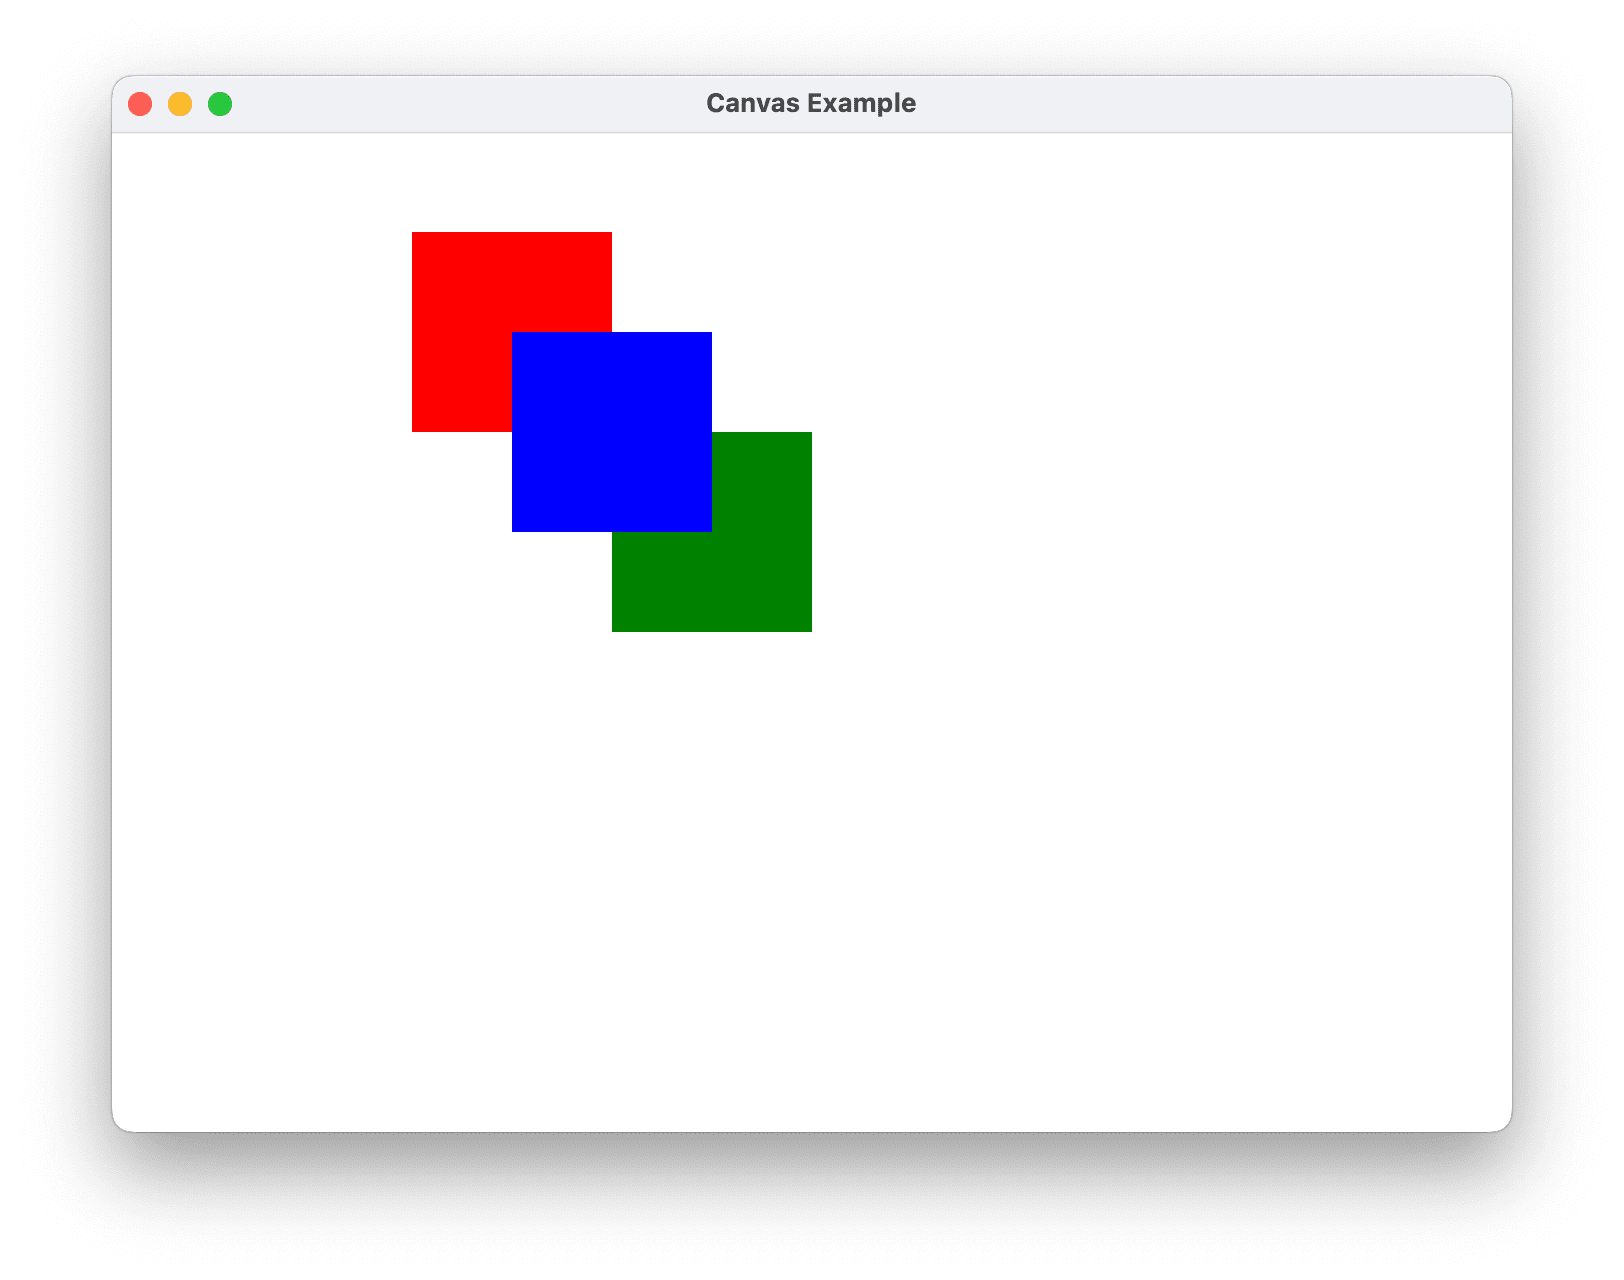
使用 XAML 或代码可以简单地实例化一个 Canvas。下面的示例演示了如何使用 Canvas 来绝对定位内容。该代码生成了三个大小为 100 像素的正方形。第一个正方形为红色,其左上角的 (x, y) 位置被指定为 (0, 0)。第二个正方形为绿色,其左上角位置为 (100, 100),刚好在第一个正方形的右下方。第三个正方形为蓝色,其左上角位置为 (50, 50),因此覆盖了第一个正方形的右下象限和第二个正方形的左上象限。由于第三个正方形是最后布局的�,它出现在其他两个正方形的上方,即重叠部分采用第三个正方形的颜色。

- XAML
- C#
<Canvas Height="400" Width="400">
  <Canvas Height="100" Width="100" Top="0" Left="0" Background="Red"/>
  <Canvas Height="100" Width="100" Top="100" Left="100" Background="Green"/>
  <Canvas Height="100" Width="100" Top="50" Left="50" Background="Blue"/>
</Canvas>
// Create the Canvas
myParentCanvas = new Canvas();
myParentCanvas.Width = 400;
myParentCanvas.Height = 400;

// Define child Canvas elements
myCanvas1 = new Canvas();
myCanvas1.Background = Brushes.Red;
myCanvas1.Height = 100;
myCanvas1.Width = 100;
Canvas.SetTop(myCanvas1, 0);
Canvas.SetLeft(myCanvas1, 0);

myCanvas2 = new Canvas();
myCanvas2.Background = Brushes.Green;
myCanvas2.Height = 100;
myCanvas2.Width = 100;
Canvas.SetTop(myCanvas2, 100);
Canvas.SetLeft(myCanvas2, 100);

myCanvas3 = new Canvas();
myCanvas3.Background = Brushes.Blue;
myCanvas3.Height = 100;
myCanvas3.Width = 100;
Canvas.SetTop(myCanvas3, 50);
Canvas.SetLeft(myCanvas3, 50);

// Add child elements to the Canvas' Children collection
myParentCanvas.Children.Add(myCanvas1);
myParentCanvas.Children.Add(myCanvas2);
myParentCanvas.Children.Add(myCanvas3);
DockPanel
DockPanel 元素使用附加属性 DockPanel.Dock 来设置子内容元素在容器边缘的位置。当 DockPanel.Dock 设置为 Top 或 Bottom 时,它会将子元素放置在彼此的上方或下方。当 DockPanel.Dock 设置为 Left 或 Right 时,它会将子元素放置在彼此的左侧或右侧。LastChildFill 属性决定了最后一个作为 DockPanel 子元素添加的元素的位置。
你可以使用 DockPanel 来定位一组相关的控件,例如一组按钮。或者,你可以使用它来创建一个“分栏式”的用户界面。
自适应大小
如果没有指定 DockPanel 的 Height 和 Width 属性,它的大小将根据其内容来确定。大小可以根据其子元素的大小进行增长或减小。然而,当指定了这些属性并且没有足够的空间来容纳下一个指定的子元素时,DockPanel 不会显示该子元素或随后的子元素,并且不会对随后的子元素进行测量。
LastChildFill 属性
默认情况下,DockPanel 元素的最后一个子元素将“填充”剩余的未分配空间。如果不希望出现这种情况,可以将 LastChildFill 属性设置为 false。
定义和使用 DockPanel
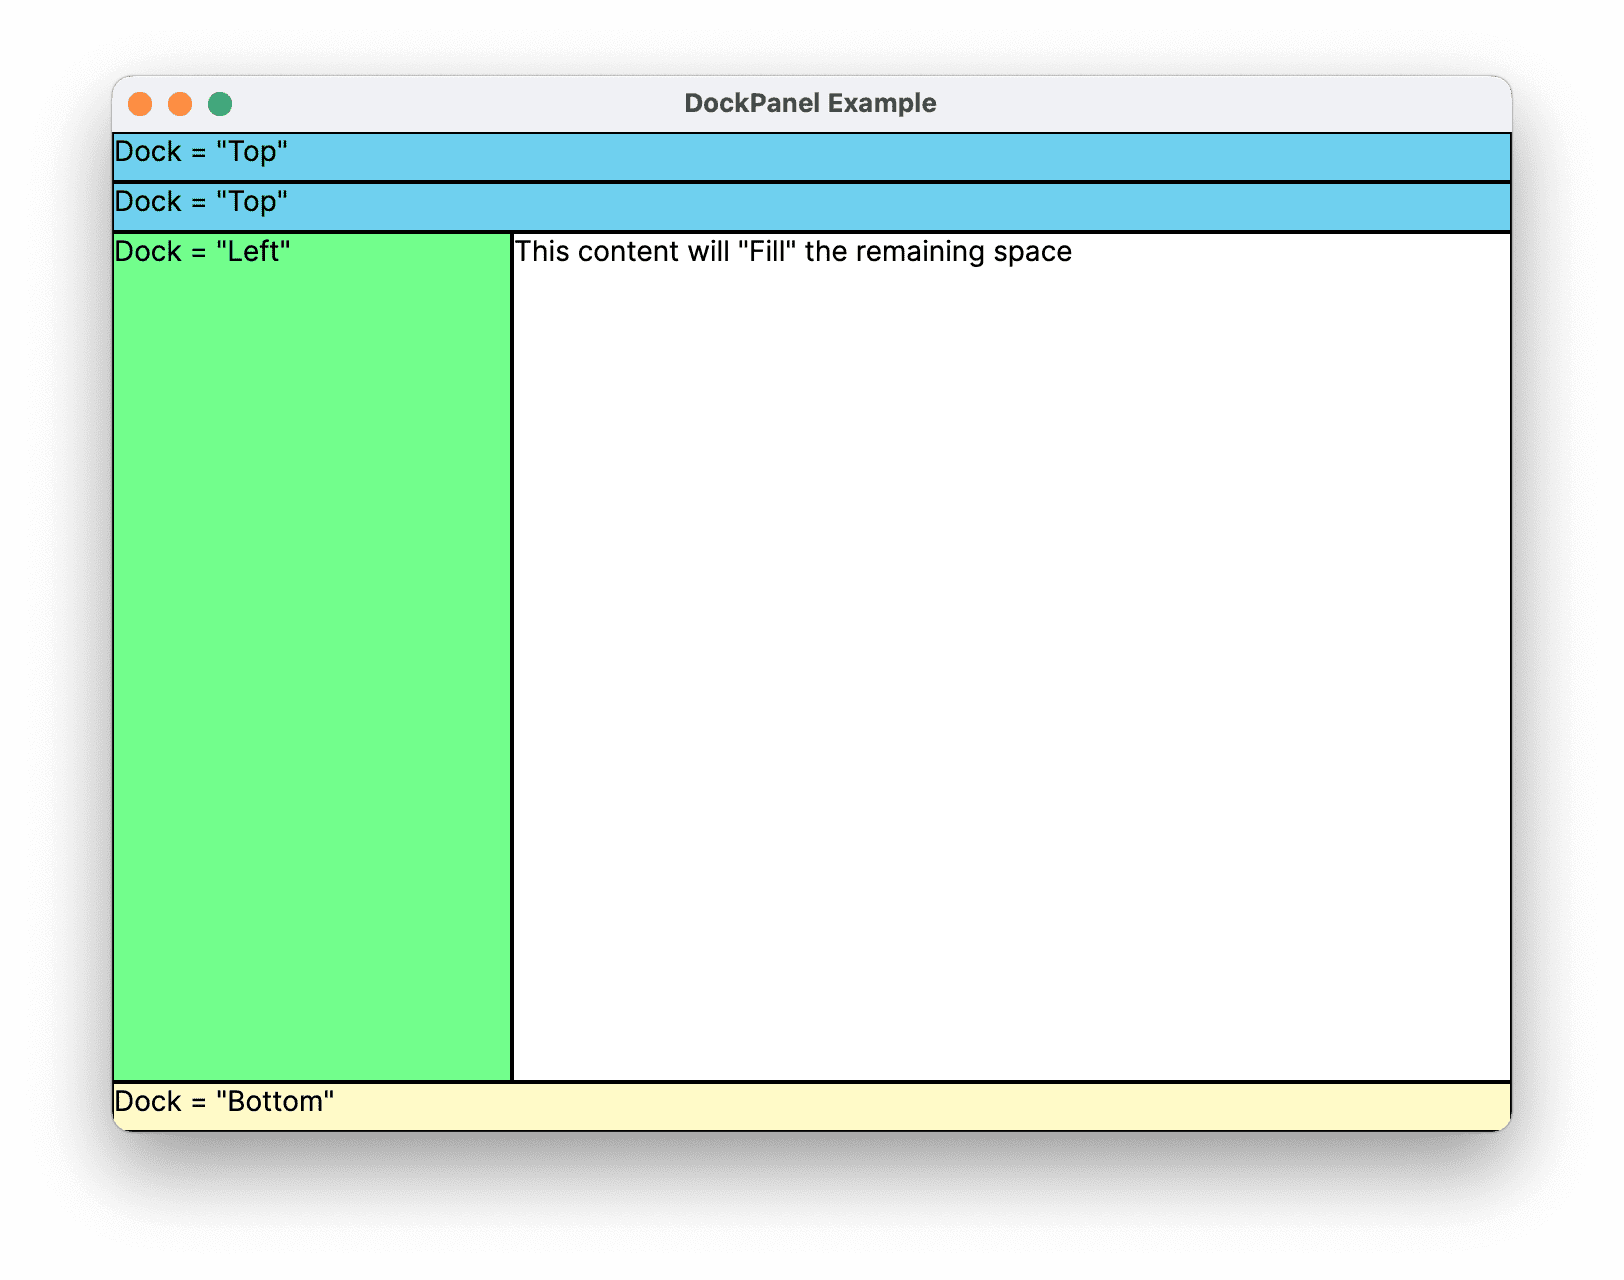
下面的示例演示了如何使用 DockPanel 来划分空间。五个 Border 元素被添加为 DockPanel 的子元素。每个元素使用 DockPanel 的不同定位属性来划分空间。最后一个元素将“填充”剩余的未分配空间。

- XAML
- C#
<DockPanel LastChildFill="True">
  <Border Height="25" Background="SkyBlue" BorderBrush="Black" BorderThickness="1" DockPanel.Dock="Top">
    <TextBlock Foreground="Black">Dock = "Top"</TextBlock>
  </Border>
  <Border Height="25" Background="SkyBlue" BorderBrush="Black" BorderThickness="1" DockPanel.Dock="Top">
    <TextBlock Foreground="Black">Dock = "Top"</TextBlock>
  </Border>
  <Border Height="25" Background="LemonChiffon" BorderBrush="Black" BorderThickness="1" DockPanel.Dock="Bottom">
    <TextBlock Foreground="Black">Dock = "Bottom"</TextBlock>
  </Border>
  <Border Width="200" Background="PaleGreen" BorderBrush="Black" BorderThickness="1" DockPanel.Dock="Left">
    <TextBlock Foreground="Black">Dock = "Left"</TextBlock>
  </Border>
  <Border Background="White" BorderBrush="Black" BorderThickness="1">
    <TextBlock Foreground="Black">This content will "Fill" the remaining space</TextBlock>
  </Border>
</DockPanel>
// Create the DockPanel
DockPanel myDockPanel = new DockPanel();
myDockPanel.LastChildFill = true;

// Define the child content
Border myBorder1 = new Border();
myBorder1.Height = 25;
myBorder1.Background = Brushes.SkyBlue;
myBorder1.BorderBrush = Brushes.Black;
myBorder1.BorderThickness = new Thickness(1);
DockPanel.SetDock(myBorder1, Dock.Top);
TextBlock myTextBlock1 = new TextBlock();
myTextBlock1.Foreground = Brushes.Black;
myTextBlock1.Text = "Dock = Top";
myBorder1.Child = myTextBlock1;

Border myBorder2 = new Border();
myBorder2.Height = 25;
myBorder2.Background = Brushes.SkyBlue;
myBorder2.BorderBrush = Brushes.Black;
myBorder2.BorderThickness = new Thickness(1);
DockPanel.SetDock(myBorder2, Dock.Top);
TextBlock myTextBlock2 = new TextBlock();
myTextBlock2.Foreground = Brushes.Black;
myTextBlock2.Text = "Dock = Top";
myBorder2.Child = myTextBlock2;

Border myBorder3 = new Border();
myBorder3.Height = 25;
myBorder3.Background = Brushes.LemonChiffon;
myBorder3.BorderBrush = Brushes.Black;
myBorder3.BorderThickness = new Thickness(1);
DockPanel.SetDock(myBorder3, Dock.Bottom);
TextBlock myTextBlock3 = new TextBlock();
myTextBlock3.Foreground = Brushes.Black;
myTextBlock3.Text = "Dock = Bottom";
myBorder3.Child = myTextBlock3;

Border myBorder4 = new Border();
myBorder4.Width = 200;
myBorder4.Background = Brushes.PaleGreen;
myBorder4.BorderBrush = Brushes.Black;
myBorder4.BorderThickness = new Thickness(1);
DockPanel.SetDock(myBorder4, Dock.Left);
TextBlock myTextBlock4 = new TextBlock();
myTextBlock4.Foreground = Brushes.Black;
myTextBlock4.Text = "Dock = Left";
myBorder4.Child = myTextBlock4;

Border myBorder5 = new Border();
myBorder5.Background = Brushes.White;
myBorder5.BorderBrush = Brushes.Black;
myBorder5.BorderThickness = new Thickness(1);
TextBlock myTextBlock5 = new TextBlock();
myTextBlock5.Foreground = Brushes.Black;
myTextBlock5.Text = "This content will Fill the remaining space";
myBorder5.Child = myTextBlock5;

// Add child elements to the DockPanel Children collection
myDockPanel.Children.Add(myBorder1);
myDockPanel.Children.Add(myBorder2);
myDockPanel.Children.Add(myBorder3);
myDockPanel.Children.Add(myBorder4);
myDockPanel.Children.Add(myBorder5);
Grid
Grid 元素合并了绝对定位和表格数据控件的功能。Grid 允许您轻松地定位和样式化元素。它允许您定义灵活的行和列分组,并且甚至可以在多个 Grid 元素之间共享大小信息。
列和行的大小行为
在 Grid 中定义的列和行可以利用 Star 大小调整功能,以便按比例分配剩余空间。当在行或列的高度或宽度中选择 Star 时,该列或行将按比例获得剩余的可用空间。这与 Auto 形式不同,后者会根据列或行中内容的大小均匀分配空间。在 XAML 中,这个值表示为 * 或 2*。在第一种情况下,行或列将获得一倍的可用空间,在第二种情况下,将获得两倍的可用空间,依此类推。通过将这种技术与 HorizontalAlignment 和 VerticalAlignment 的值设置为 Stretch 结合使用,可以按屏幕空间的百分比划分布局空间。Grid 是唯一可以以这种方式分配空间的布局面板。
定义和使用 Grid
下面的示例演示了如何构建一个类似于 Windows 开始菜单中的“运行”对话框的用户界面。
- XAML
- C#
<Grid Background="Gainsboro"
      HorizontalAlignment="Left"
      VerticalAlignment="Top"
      Width="425"
      Height="165"
      ColumnDefinitions="Auto,*,*,*,*"
      RowDefinitions="Auto,Auto,*,Auto">

    <Image Grid.Row="0" Grid.Column="0" Source="{Binding runicon}" />

    <TextBlock Grid.Row="0" Grid.Column="1" Grid.ColumnSpan="4"
               Text="Type the name of a program, folder, document, or Internet resource, and Windows will open it for you."
               TextWrapping="Wrap" />

    <TextBlock Grid.Row="1" Grid.Column="0" Text="Open:" />

    <TextBox Grid.Row="1" Grid.Column="1" Grid.ColumnSpan="5" />

    <Button Grid.Row="3" Grid.Column="2" Content="OK" Margin="10,0,10,15" />

    <Button Grid.Row="3" Grid.Column="3" Content="Cancel" Margin="10,0,10,15" />

    <Button Grid.Row="3" Grid.Column="4" Content="Browse ..." Margin="10,0,10,15" />
</Grid>
// Create the Grid.
grid1 = new Grid ();
grid1.Background = Brushes.Gainsboro;
grid1.HorizontalAlignment = HorizontalAlignment.Left;
grid1.VerticalAlignment = VerticalAlignment.Top;
grid1.ShowGridLines = true;
grid1.Width = 425;
grid1.Height = 165;

// Define the Columns.
colDef1 = new ColumnDefinition();
colDef1.Width = new GridLength(1, GridUnitType.Auto);
colDef2 = new ColumnDefinition();
colDef2.Width = new GridLength(1, GridUnitType.Star);
colDef3 = new ColumnDefinition();
colDef3.Width = new GridLength(1, GridUnitType.Star);
colDef4 = new ColumnDefinition();
colDef4.Width = new GridLength(1, GridUnitType.Star);
colDef5 = new ColumnDefinition();
colDef5.Width = new GridLength(1, GridUnitType.Star);
grid1.ColumnDefinitions.Add(colDef1);
grid1.ColumnDefinitions.Add(colDef2);
grid1.ColumnDefinitions.Add(colDef3);
grid1.ColumnDefinitions.Add(colDef4);
grid1.ColumnDefinitions.Add(colDef5);

// Define the Rows.
rowDef1 = new RowDefinition();
rowDef1.Height = new GridLength(1, GridUnitType.Auto);
rowDef2 = new RowDefinition();
rowDef2.Height = new GridLength(1, GridUnitType.Auto);
rowDef3 = new RowDefinition();
rowDef3.Height = new GridLength(1, GridUnitType.Star);
rowDef4 = new RowDefinition();
rowDef4.Height = new GridLength(1, GridUnitType.Auto);
grid1.RowDefinitions.Add(rowDef1);
grid1.RowDefinitions.Add(rowDef2);
grid1.RowDefinitions.Add(rowDef3);
grid1.RowDefinitions.Add(rowDef4);

// Add the Image.
img1 = new Image();
img1.Source = runicon;
Grid.SetRow(img1, 0);
Grid.SetColumn(img1, 0);

// Add the main application dialog.
txt1 = new TextBlock();
txt1.Text = "Type the name of a program, folder, document, or Internet resource, and Windows will open it for you.";
txt1.TextWrapping = TextWrapping.Wrap;
Grid.SetColumnSpan(txt1, 4);
Grid.SetRow(txt1, 0);
Grid.SetColumn(txt1, 1);

// Add the second text cell to the Grid.
txt2 = new TextBlock();
txt2.Text = "Open:";
Grid.SetRow(txt2, 1);
Grid.SetColumn(txt2, 0);

// Add the TextBox control.
tb1 = new TextBox();
Grid.SetRow(tb1, 1);
Grid.SetColumn(tb1, 1);
Grid.SetColumnSpan(tb1, 5);

// Add the buttons.
button1 = new Button();
button2 = new Button();
button3 = new Button();
button1.Content = "OK";
button2.Content = "Cancel";
button3.Content = "Browse ...";
Grid.SetRow(button1, 3);
Grid.SetColumn(button1, 2);
button1.Margin = new Thickness(10, 0, 10, 15);
button2.Margin = new Thickness(10, 0, 10, 15);
button3.Margin = new Thickness(10, 0, 10, 15);
Grid.SetRow(button2, 3);
Grid.SetColumn(button2, 3);
Grid.SetRow(button3, 3);
Grid.SetColumn(button3, 4);

grid1.Children.Add(img1);
grid1.Children.Add(txt1);
grid1.Children.Add(txt2);
grid1.Children.Add(tb1);
grid1.Children.Add(button1);
grid1.Children.Add(button2);
grid1.Children.Add(button3);
StackPanel
StackPanel 允许您在指定的方向上“堆叠”元素。默�认的堆叠方向是垂直的。Orientation 属性可用于控制内容的流向。
StackPanel 对比 DockPanel
虽然 DockPanel 也可以“堆叠”子元素,但在某些使用场景中,DockPanel 和 StackPanel 的结果并不相同。例如,在 DockPanel 中,子元素的顺序会影响它们的大小,而在 StackPanel 中则不会。这是因为 StackPanel 在堆叠方向上测量的大小是 PositiveInfinity,而 DockPanel 仅测量可用大小。
定义和使用 StackPanel
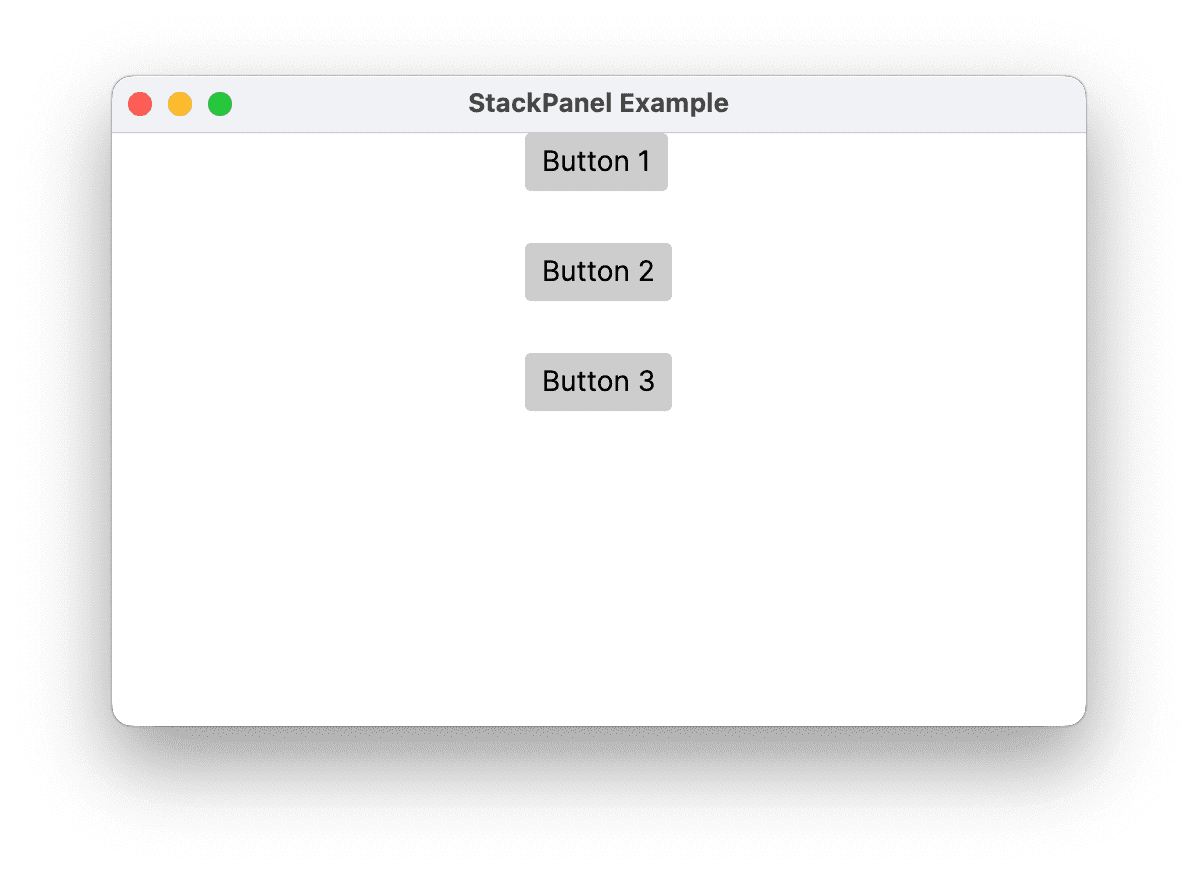
下面的示例演示了如何使用 StackPanel 创建一组垂直定位的按钮。如果要进行水平定位,请将 Orientation 属性设置为 Horizontal。

- XAML
- C#
 <StackPanel HorizontalAlignment="Center"
                VerticalAlignment="Top"
                Spacing="25">
        <Button Content="Button 1" />
        <Button Content="Button 2" />
        <Button Content="Button 3" />
    </StackPanel>
// Define the StackPanel
myStackPanel = new StackPanel();
myStackPanel.HorizontalAlignment = HorizontalAlignment.Center;
myStackPanel.VerticalAlignment = VerticalAlignment.Top;
myStackPanel.Spacing = 25;

// Define child content
Button myButton1 = new Button();
myButton1.Content = "Button 1";
Button myButton2 = new Button();
myButton2.Content = "Button 2";
Button myButton3 = new Button();
myButton3.Content = "Button 3";

// Add child elements to the parent StackPanel
myStackPanel.Children.Add(myButton1);
myStackPanel.Children.Add(myButton2);
myStackPanel.Children.Add(myButton3);
WrapPanel
WrapPanel 用于按从左到右的顺序定位子元素,并在其父容器的边缘到达时将内容折行到下一行。内容可以水平或垂直方向上定位。WrapPanel 在简单的流式界面场景中非常有用。它还可以用于对其所有子元素应用统一的大小。
下面的示例演示了如何创建一个 WrapPanel 来显示 Button 控件,并在它们到达容器边缘时进行折行。

- XAML
- C#
<Border HorizontalAlignment="Left" VerticalAlignment="Top" BorderBrush="Black" BorderThickness="2">
  <WrapPanel Background="LightBlue" Width="200" Height="100">
    <Button Width="200">Button 1</Button>
    <Button>Button 2</Button>
    <Button>Button 3</Button>
    <Button>Button 4</Button>
  </WrapPanel>
</Border>
// Instantiate a new WrapPanel and set properties
myWrapPanel = new WrapPanel();
myWrapPanel.Background = System.Windows.Media.Brushes.Azure;
myWrapPanel.Orientation = Orientation.Horizontal;
myWrapPanel.Width = 200;
myWrapPanel.HorizontalAlignment = HorizontalAlignment.Left;
myWrapPanel.VerticalAlignment = VerticalAlignment.Top;

// Define 3 button elements. The last three buttons are sized at width
// of 75, so the forth button wraps to the next line.
btn1 = new Button();
btn1.Content = "Button 1";
btn1.Width = 200;
btn2 = new Button();
btn2.Content = "Button 2";
btn2.Width = 75;
btn3 = new Button();
btn3.Content = "Button 3";
btn3.Width = 75;
btn4 = new Button();
btn4.Content = "Button 4";
btn4.Width = 75;

// Add the buttons to the parent WrapPanel using the Children.Add method.
myWrapPanel.Children.Add(btn1);
myWrapPanel.Children.Add(btn2);
myWrapPanel.Children.Add(btn3);
myWrapPanel.Children.Add(btn4);
嵌套面板元素
Panel 元素可以相互嵌套,以创建复杂的布局。这在某些情况下非常有用,例如一个 Panel 对于 UI 的某个部分可能非常合适,但对于另一个部分可能不符合需求。
在您的应用程序中,理论上可以无限嵌套面板元素,但通常最好仅使用实际需要的面板元素来实现所需的布局。在许多情况下,由于其作为布局容器的灵活性,可以使用 Grid 元素来替代嵌套面板。这样可以通过将不必要的元素排除在布局树之外,提高应用程序的性能。
UniformGrid
UniformGrid 是一种提供统一网格布局的面板类型。这意味着它会将其子元素布局在一个网格中,该网格中的所有单元格大小相同。与标准的 Grid 不同,UniformGrid 不支持显式行和列,也不提供 Grid.Row 或 Grid.Column 附加属性。
UniformGrid 的主要用途是在需要以网格格式显示项目集合的情况下,�每个项目占用相同的空间。
UniformGrid 属性
- 行和列:
UniformGrid使用Rows和Columns属性来确定其子元素的布局。如果只设置其中一个属性,UniformGrid将自动计算另一个属性,以创建适合子元素总数的网格。如果两个属性都不设置,UniformGrid默认为 1 行 1 列的网格。
例如,如果有 12 个项目,并将 Rows 设置为 3,则 UniformGrid 将自动创建 4 列。如果将 Columns 设置为 4,则它将自动创建 3 行。
- FirstColumn:
FirstColumn属性允许您在网格的第一行中留下一定数量的空单元格。
定义和使用 UniformGrid
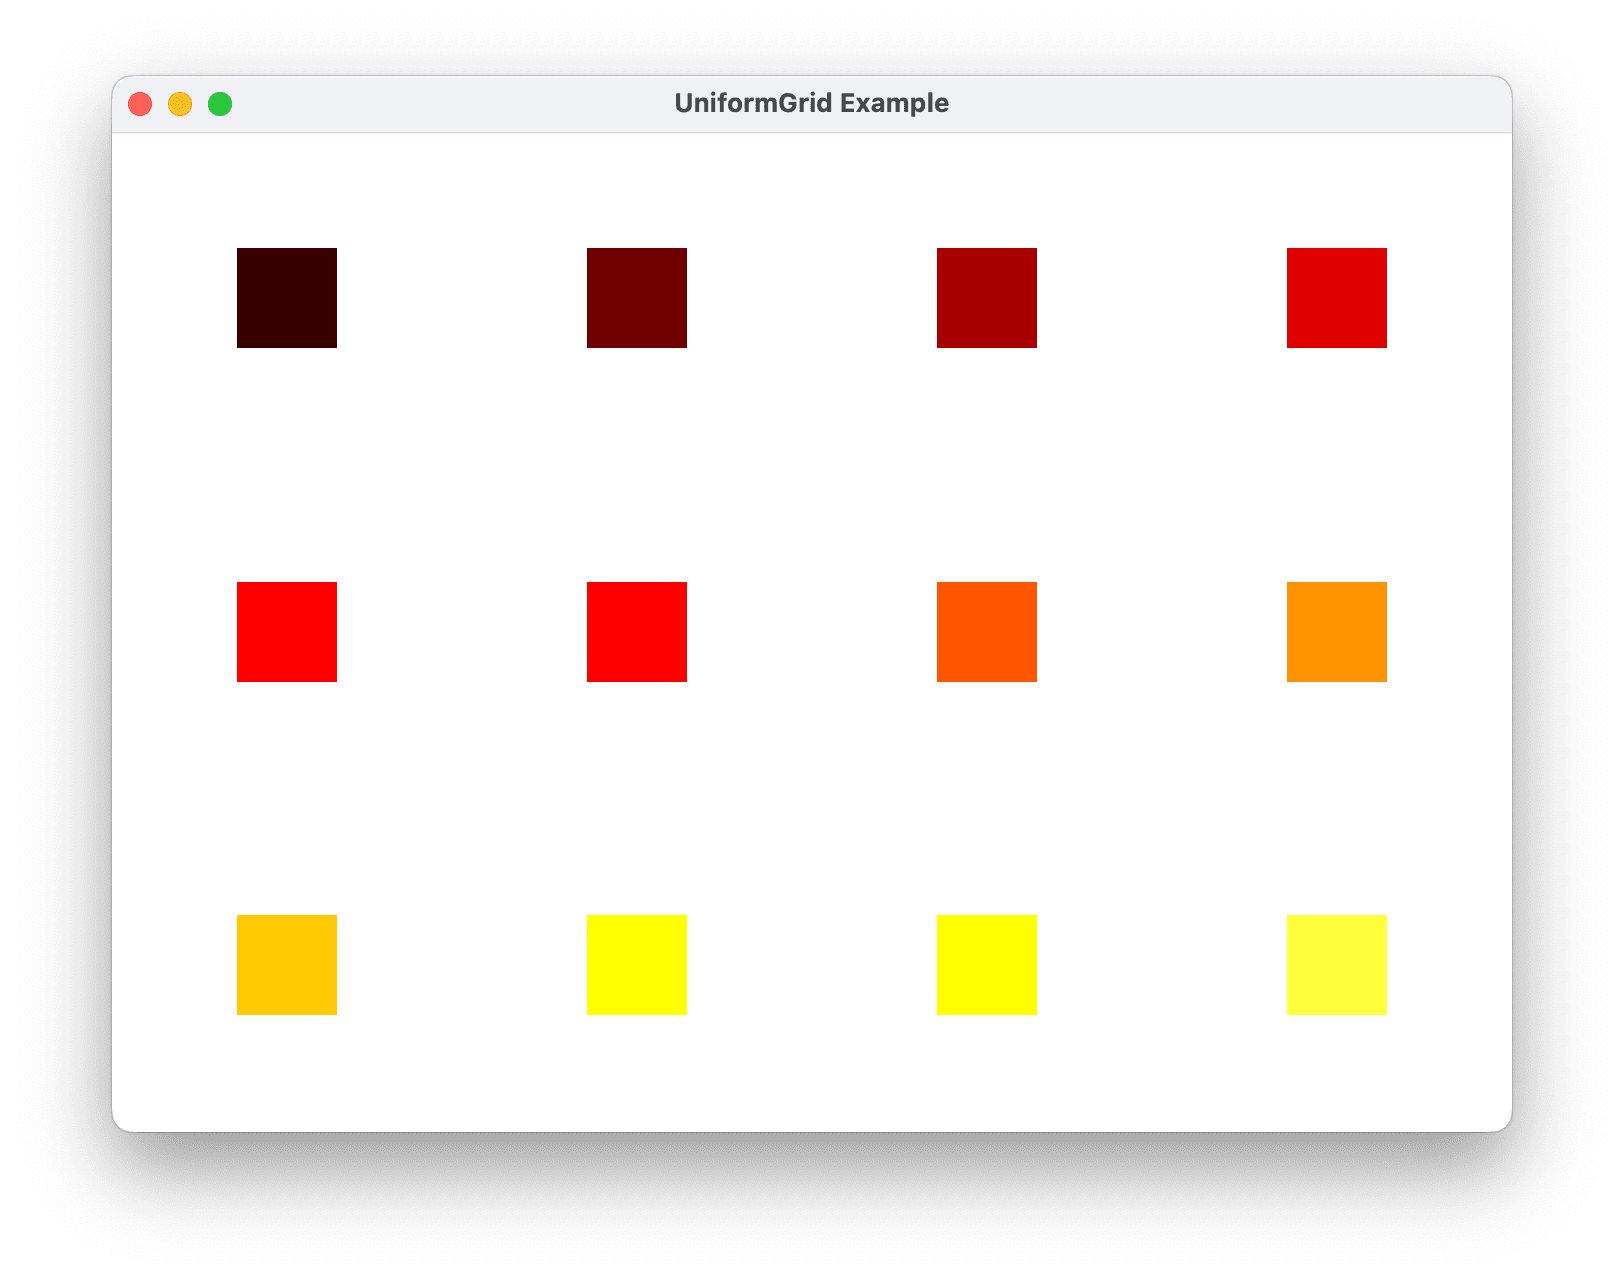
下面的示例演示了如何定义和使用 UniformGrid。该示例创建了一个 3 行 4 列的 UniformGrid,并将 12 个矩形作为子元素添加进去。

- XAML
- C#
<UniformGrid Rows="3" Columns="4">
  <Rectangle Width="50" Height="50" Fill="#330000"/>
  <Rectangle Width="50" Height="50" Fill="#660000"/>
  <Rectangle Width="50" Height="50" Fill="#990000"/>
  <Rectangle Width="50" Height="50" Fill="#CC0000"/>
  <Rectangle Width="50" Height="50" Fill="#FF0000"/>
  <Rectangle Width="50" Height="50" Fill="#FF3300"/>
  <Rectangle Width="50" Height="50" Fill="#FF6600"/>
  <Rectangle Width="50" Height="50" Fill="#FF9900"/>
  <Rectangle Width="50" Height="50" Fill="#FFCC00"/>
  <Rectangle Width="50" Height="50" Fill="#FFFF00"/>
  <Rectangle Width="50" Height="50" Fill="#FFFF33"/>
  <Rectangle Width="50" Height="50" Fill="#FFFF66"/>
</UniformGrid>
// Create the UniformGrid
UniformGrid myUniformGrid = new UniformGrid();
myUniformGrid.Rows = 3;
myUniformGrid.Columns = 4;

// Define the child content
for (int i = 0; i < 12; i++)
{
    Rectangle myRectangle = new Rectangle();
    myRectangle.Fill = new SolidColorBrush(Color.FromRgb((byte)(i * 20), 0, 0));
    myRectangle.Width = 50;
    myRectangle.Height = 50;
    myUniformGrid.Children.Add(myRectangle);
}
在上面的示例中,每个 Rectangle 被自动分配到网格中的一个单元格,按照它们被添加的顺序进行分配。