TreeDataGrid control
The TreeDataGrid combines tree view and data grid functionality in a single control, displaying hierarchical and tabular data together. It supports two modes:
- Flat displays data in a two-dimensional table, similar to a standard data grid.
- Hierarchical displays data in an expandable tree with optional columns.
This control is available as part of Avalonia Pro or higher.
TreeDataGrid v12 introduces significant API changes including renamed column types, a new XAML-first workflow, and a fluent code-behind API. See the breaking changes document for full migration guidance.
Getting started
- Install the
Avalonia.Controls.TreeDataGridNuGet package by runningdotnet add package.
dotnet add package Avalonia.Controls.TreeDataGrid
- Include your Avalonia license key in the executable project file (
.csproj). Your license key is available from the Avalonia portal.
<ItemGroup>
  <AvaloniaUILicenseKey Include="YOUR_LICENSE_KEY" />
</ItemGroup>
For multi-project solutions, you can store your licence key in an environment variable or a shared props file to avoid duplication.
- Reference the
TreeDataGridfluent theme via aStyleIncludein yourApp.axamlfile. This adds the resources needed to render the control.
<Application.Styles>
    <StyleInclude Source="avares://Avalonia.Controls.TreeDataGrid/Themes/Fluent.axaml"/>
    <!-- other styles -->
</Application.Styles>
For more information on installing Avalonia Pro controls, see Installing Avalonia Pro.
Useful properties
You will probably use these properties most often:
| Property | Description |
|---|---|
ItemsSource | Binds to a collection for XAML-defined columns. |
Source | The data source that drives the control's rows and columns (code-behind approach). |
SelectionMode | The selection mode, e.g. Row, Cell, Row,Multiple. Default is Row (single selection). |
CanUserResizeColumns | Whether the user can adjust column widths with the pointer. Default is false. |
CanUserSortColumns | Whether the user can sort columns by clicking the header. Default is true. |
Two approaches
There are two ways to set up a TreeDataGrid:
- XAML columns — set
ItemsSourceand define columns directly in XAML markup. This is the simplest approach. - Code-behind source — create a
FlatTreeDataGridSourceorHierarchicalTreeDataGridSourcein your view model using the fluent API, and bind it to theSourceproperty. This approach is required for features like filtering and programmatic expand/collapse.
Both approaches are shown in the examples below.
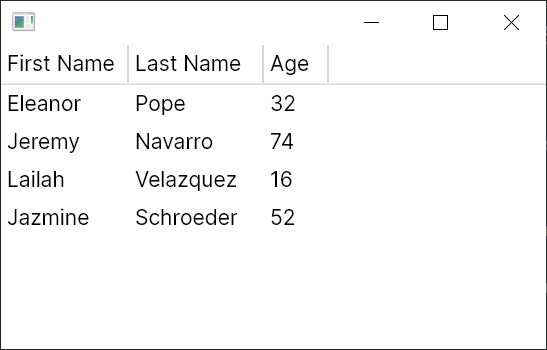
Flat data
Data model
Start with a simple Person class:
public class Person
{
    public string? FirstName { get; set; }
    public string? LastName { get; set; }
    public int Age { get; set; }
}
Then create a MainWindowViewModel with some sample data stored in an ObservableCollection<T>, so the grid automatically reflects changes:
using System.Collections.ObjectModel;

public class MainWindowViewModel
{
    public ObservableCollection<Person> People { get; } = new()
    {
        new Person { FirstName = "Eleanor", LastName = "Pope", Age = 32 },
        new Person { FirstName = "Jeremy", LastName = "Navarro", Age = 74 },
        new Person { FirstName = "Lailah ", LastName = "Velazquez", Age = 16 },
        new Person { FirstName = "Jazmine", LastName = "Schroeder", Age = 52 },
    };
}
XAML columns
Define columns directly in the TreeDataGrid markup using ItemsSource:
<Window xmlns="https://github.com/avaloniaui"
        xmlns:x="http://schemas.microsoft.com/winfx/2006/xaml"
        x:Class="AvaloniaApplication.MainWindow">
  <TreeDataGrid ItemsSource="{Binding People}">
    <TreeDataGridTextColumn Header="First Name" Binding="{Binding FirstName}" />
    <TreeDataGridTextColumn Header="Last Name" Binding="{Binding LastName}" />
    <TreeDataGridTextColumn Header="Age" Binding="{Binding Age}" />
  </TreeDataGrid>
</Window>
Code-behind source
Alternatively, create a FlatTreeDataGridSource<T> in your view model using the fluent API and bind it to the Source property:
using System.Collections.ObjectModel;
using Avalonia.Controls;

public class MainWindowViewModel
{
    private ObservableCollection<Person> _people = new()
    {
        new Person { FirstName = "Eleanor", LastName = "Pope", Age = 32 },
        new Person { FirstName = "Jeremy", LastName = "Navarro", Age = 74 },
        new Person { FirstName = "Lailah", LastName = "Velazquez", Age = 16 },
        new Person { FirstName = "Jazmine", LastName = "Schroeder", Age = 52 },
    };

    public MainWindowViewModel()
    {
        Source = new FlatTreeDataGridSource<Person>(_people)
            .WithTextColumn("First Name", x => x.FirstName)
            .WithTextColumn("Last Name", x => x.LastName)
            .WithTextColumn(x => x.Age);
    }

    public FlatTreeDataGridSource<Person> Source { get; }
}
<Window xmlns="https://github.com/avaloniaui"
        xmlns:x="http://schemas.microsoft.com/winfx/2006/xaml"
        x:Class="AvaloniaApplication.MainWindow">
  <TreeDataGrid Source="{Binding Source}"/>
</Window>
Run the application
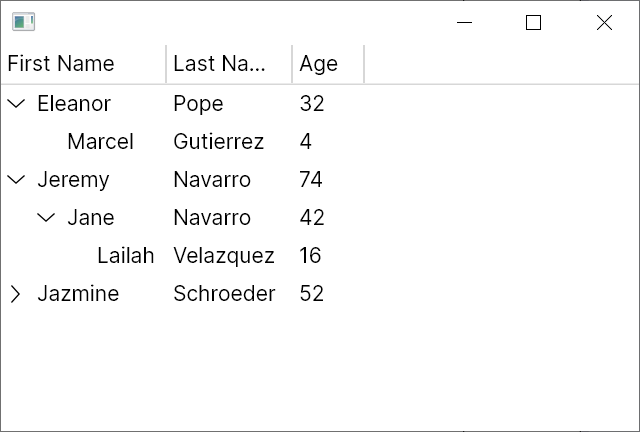
Hierarchical data
Data model
The hierarchical model is the same Person class with an added Children collection:
public class Person
{
    public string? FirstName { get; set; }
    public string? LastName { get; set; }
    public int Age { get; set; }
    public ObservableCollection<Person> Children { get; } = new();
}
The view model now contains nested data:
using System.Collections.ObjectModel;

public class MainWindowViewModel
{
    public ObservableCollection<Person> People { get; } = new()
    {
        new Person
        {
            FirstName = "Eleanor",
            LastName = "Pope",
            Age = 32,
            Children =
            {
                new Person { FirstName = "Marcel", LastName = "Gutierrez", Age = 4 },
            }
        },
        new Person
        {
            FirstName = "Jeremy",
            LastName = "Navarro",
            Age = 74,
            Children =
            {
                new Person
                {
                    FirstName = "Jane",
                    LastName = "Navarro",
                    Age = 42 ,
                    Children =
                    {
                        new Person { FirstName = "Lailah ", LastName = "Velazquez", Age = 16 }
                    }
                },
            }
        },
        new Person { FirstName = "Jazmine", LastName = "Schroeder", Age = 52 },
    };
}
XAML columns
Use TreeDataGridHierarchicalExpanderColumn to wrap the column that should display the tree expander. The ChildrenBinding attribute specifies how to find child items:
<Window xmlns="https://github.com/avaloniaui"
        xmlns:x="http://schemas.microsoft.com/winfx/2006/xaml"
        x:Class="AvaloniaApplication.MainWindow">
  <TreeDataGrid ItemsSource="{Binding People}">
    <TreeDataGridHierarchicalExpanderColumn Header="First Name"
                                            ChildrenBinding="{Binding Children}">
      <TreeDataGridTextColumn Binding="{Binding FirstName}" />
    </TreeDataGridHierarchicalExpanderColumn>
    <TreeDataGridTextColumn Header="Last Name" Binding="{Binding LastName}" />
    <TreeDataGridTextColumn Header="Age" Binding="{Binding Age}" />
  </TreeDataGrid>
</Window>
Code-behind source
For the code-behind approach, use HierarchicalTreeDataGridSource<T> with the WithHierarchicalExpanderTextColumn fluent method:
using System.Collections.ObjectModel;
using Avalonia.Controls;

public class MainWindowViewModel
{
    private ObservableCollection<Person> _people = /* defined earlier */

    public MainWindowViewModel()
    {
        Source = new HierarchicalTreeDataGridSource<Person>(_people)
            .WithHierarchicalExpanderTextColumn(
                "First Name",
                x => x.FirstName,
                x => x.Children)
            .WithTextColumn("Last Name", x => x.LastName)
            .WithTextColumn(x => x.Age);
    }

    public HierarchicalTreeDataGridSource<Person> Source { get; }
}
<Window xmlns="https://github.com/avaloniaui"
        xmlns:x="http://schemas.microsoft.com/winfx/2006/xaml"
        x:Class="AvaloniaApplication.MainWindow">
  <TreeDataGrid Source="{Binding Source}"/>
</Window>
Run the application